2. Delegate Role-Based Permissions
One of the powerful
benefits of RBAC is that you can tailor the access model to meet the
needs of your organization at a granular level. You have the ability to
edit the existing role groups as well as the ability to add new roles or
role groups that you design. In this section, we'll walk through the
process of both editing the existing RBAC configuration and creating and
using your own roles.
2.1. Customize Roles
Exchange Server 2010 comes
with dozens of roles out of the box. These roles cover a wide variety of
access permissions. Sometimes you might find that a built-in role
handles everything you want but allows access to a cmdlet that you don't
want users or administrators in the role to have access to. For
example, one of the roles built into Exchange is called Mailbox Import
Export. This role has permission to both export and import mail from
mailboxes. But suppose that you want an administrator to be able to
export mail but not import it.
If you only wanted to allow
administrators to export mail, you must remove access to the
Import-Mailbox cmdlet. However, you cannot modify the built-in roles.
Instead, you must create a new role and give it access to the cmdlets
that you want to use.
To create a new role, you can
use the New-ManagementRole cmdlet. When you create the role, you will
need to derive the role from an existing one. When you do this, there
will be a parent/child relationship established between the roles. The
child role (the one that you created) will allow all the cmdlets that
the parent role allows. You will then need to go into the child role and
remove the cmdlets that you don't want people with that role to have
access to.
To create a custom role based on an existing role, do the following:
Create the new management role.
Determine which cmdlets you want to remove access to.
Modify the role that you created, removing access to the management role entries that you don't want your role-holders to use.
Using our example of exporting
mail, we will make a child role and use the Mailbox Import Export role
as the parent. The following command can be used to create a new child
role called Mailbox Export that uses the existing built-in Mailbox
Import Export role as its parent:
New-ManagementRole "Mailbox Export" -Parent
"Mailbox Import Export"
After the role is created, you
can view the cmdlets that the role is allowed to run. Remember that
these cmdlets were derived from the role that you designated as the
parent. The following command displays these cmdlets:
Get-ManagementRole "Mailbox Export" |
Get-ManagementRoleEntry
You can go through the list
and determine which cmdlets you want to remove access to. In our
scenario, we will remove access to the Import-Mailbox cmdlet. To remove a role's access to a cmdlet, you can use the Remove-ManagementRoleEntry cmdlet. You must reference the identity of the role entry (the cmdlet) as Role Name\Entry Name. For example, the role entry that we are removing in the following command is Mailbox Export\Import-Mailbox. In most cases, the name of the role entry will be the name of a cmdlet. The following example removes access to the Import-Mailbox cmdlet without asking for confirmation:
Remove-ManagementRoleEntry "Mailbox Export\Import-Mailbox"
-Confirm: $False
2.2. Assign Roles to Administrators
After you have your roles
defined in the manner that best fits your needs, you must assign those
roles to people. The process for assigning roles to administrators is
different from the process for assigning roles to users. You will want
to assign roles to role groups and then add your administrators to the
appropriate role groups. Here's the process:
Determine if an existing role group already contains all of the roles that you want to use.
If needed, customize a role group to contain the roles that you need.
Add the administrator accounts to the appropriate role group.
2.2.1. Determine If You Can Use an Existing Role Group
If an existing role group
meets your needs, it's simple to grant the roles to the administrators.
You only need to make the administrator's account a member of the role
group. But you first need to find out whether an existing group meets
your needs. Table 12.1 earlier in this chapter provides an overview of the built-in role groups.
If you want to see for
yourself what roles the existing role groups contain, you can use the
EMS. The following command uses the Get-RoleGroup cmdlet to list each of
the roles that the group holds:
Get-RoleGroup | ft Name, Roles
You can also get even more
granular and view the list of cmdlets that a particular role has access
to. The following command displays the cmdlets for the administrators in
the Discovery Management role group:
Get-RoleGroup "Discovery Management" | foreach
{ $_.Roles | Get-ManagementRole | Get-ManagementRoleEntry }
2.2.2. Use a Customized Role Group
After going through the roles
available in the existing role groups, you may decide that none suit
your needs and you want to customize a role group instead. When you
customize a role group, you can add an existing built-in role or you can
use a custom role that you created. Whether you decide to use a
built-in role or your own customized role, the procedures for assigning
these roles to a role group are the same.
If you recall from
earlier, roles are associated with role groups using a role assignment. A
role assignment assigns only one role to only one role group. Each time
that role is assigned to another role group, another role assignment
needs to be created. When you create the new role assignment, you can
just specify the role that you want to assign and the role group that
you want to assign it to. Exchange will automatically name the role
assignment for you, and I recommend letting it do so.
You can create a new role assignment by using the New-ManagementRoleAssignment cmdlet in the EMS. For example, the following command assigns the Mailbox Export role to the Discovery Management role group:
New-ManagementRoleAssignment -SecurityGroup
"Discovery Management" -Role "Mailbox Export"
You also have the option of
creating a new role group if you don't want to use an existing one. To
create a new role group, use the New-RoleGroup cmdlet in the EMS. The following example creates a new role group called Lawyers:
New-RoleGroup "Lawyers" -Roles "Mailbox Search",
"Mailbox Import Export"
After you have created a
custom role group, you can use the same process of creating a role
assignment for the group in order to assign roles to it.
2.2.3. Add Administrators to a Role Group
You can add administrators to role groups in one of two ways:
To add the administrator to the role group using the ECP, use the following steps:
Open
the Exchange Control Panel by browsing to the ECP URL from an Internet
browser. The URL is typically the URL of the Client Access server with
/ecp—for example, https://mail.contoso.com/ecp.
Log on to the ECP with an account that has privileges to modify the membership of the role group.
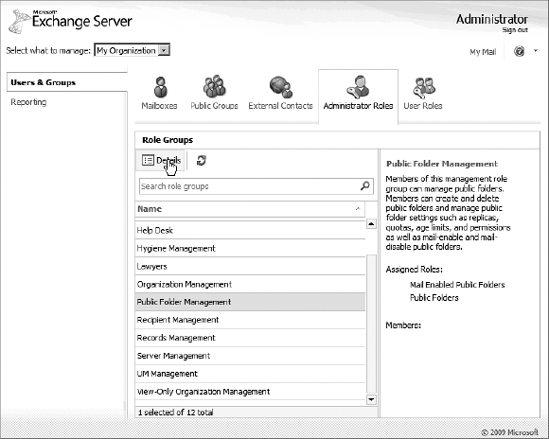
When
the ECP loads, ensure that the Select What To Manage box in the upper
left of the page is set to My Organization. Then click the Administrator
Roles icon.
In
the list of role groups, select the group that you want to add the
administrator to and click the Details button, as shown in Figure 3.
The
Role Group dialog box will launch and list the roles that are assigned
to the group. To add a member to the group, click the Add button in the
Members section near the bottom of the dialog box.
In
the Select Members dialog box, choose the accounts that you want to add
to the role group and click the Add button. After you are finished
selecting accounts, click OK to close the Select Members dialog box.
Back
in the Role Group dialog box, the accounts that you selected should
have been added to the list of members. Click the Save button to make
the changes and close the Role Group dialog box.
You can also use the EMS to add administrators to a role group. You will use the Add-RoleGroupMember
cmdlet to do this. Specify the name of the role group and use the
Member parameter to specify the account that you are adding to the
group, as shown in the following example:
Add-RoleGroupMember "Lawyers" -Member "Nora Shea"
2.3. Assign Roles to Users
In addition to
giving permissions to resources for administrators, RBAC is also used in
Exchange Server 2010 to delegate access to end users. Your end users
typically won't be modifying Exchange server settings or organization
settings. However, they may need to modify their personal information,
such as address or phone number, or they may need permissions to manage
their own distribution groups. In order to do this, you will need to
assign roles to your users.
Users aren't added to role
groups like administrator accounts are. Instead users are assigned roles
by using a role assignment policy. Each user account can have only one
role assignment policy defined.
Exchange defines a
default role assignment policy. The default role assignment policy
allows users to manage OWA settings, contact information, voice mail,
text messaging, and distribution group membership. In most cases, the
default policy will suit your needs.
You have the option of
creating your own role assignment policy and assigning your own roles to
it. You can override the default policy for user accounts and use your
custom policy instead. Using a custom role assignment policy involves
three steps:
Create the new role assignment policy.
Assign the policy to the users who you want it to apply to.
2.3.1. Create a New Role Assignment Policy
To create a new role assignment policy, you can use the New-RoleAssignmentPolicy
cmdlet in the EMS. You only need to specify the name of the policy. You
will link the roles to the policy in a later step. The following
example creates a custom role assignment policy:
New-RoleAssignmentPolicy "Enhanced User Role Policy"
You can determine whether
you want your new policy to take the place of the existing default role
assignment policy that is applied to new mailboxes. If you want to use
the new policy as the default policy, add the IsDefault parameter to the command:
New-RoleAssignmentPolicy "Enhanced User Role Policy"
-IsDefault
2.3.2. Add Roles to the Role Assignment Policy
After the policy is created, you can add roles to the policy. Similarly to RBAC for administrator roles, you use the New-ManagementRoleAssignment
cmdlet to add the roles. For example, to add the custom management role
called Extended Attribute Modification to the Enhanced User role
policy, use the following command:
New-ManagementRoleAssignment -Role "Extended Attribute
Modification" -Policy "Enhanced User Role Policy"
2.3.3. Assign the Role Assignment Policy to Mailboxes
The final step is to assign
the policy to the users that you want the policy to apply to. If you set
the policy as the default policy, it only applies to new mailboxes.
Existing mailboxes will need to be changed manually.
To modify the role assignment policy for a mailbox, you must use the Set-Mailbox cmdlet with the RoleAssignmentPolicy parameter. The following sample command shows how to configure this:
Set-Mailbox lincoln -RoleAssignmentPolicy
"Enhanced User Role Policy"
|
Setting a role assignment
policy on a mailbox overrides any existing role assignment policies
that may be in place. Each mailbox can only have one role assignment
policy assigned to it.
|
|